
Baked vada pav – I’ll be honest I don’t like fusion food. I don’t like my food being messed with. I like to enjoy my favourite dishes like how I have always had them. If the dish calls for butter then no substitute should be used according to me. No margarine No nutralite. Nope. No, just NO !! So What is this hybridized version of the king of Mumbai street food doing on my website ??
You can watch the full recipe video here –
Trust me , this version of baked vada pav is just as good as the original fried version. You wont even know the difference. So I absolutely had to share this recipe 😊.
The advantage of this baked vada pav recipe is that it is totally healthy and you end up eliminating a few messy steps. No more worrying about left over oil !!
The key to make this as tasty as regular vada pav is to make a super flavourful potato filling. It should be spicy and very well seasoned. Once the potato filling is stuffed in the bread dough, after baking it should not taste bland.
To make this baked vada pav recipe even healthier you can replace half the maida with whole wheat flour or atta.
This is a great recipe to make as a party snack or finger food. You can make these 3-4 hours prior to serving and reheat them in the oven at 100 C for 15-20 mins. Rub them with some melted butter as soon as they are out of the oven. ( see notes) You can also microwave them for 15-20 secs, not more as the bread may become chewy.
I have used instant yeast in this recipe. Which is a quick dissolving – fast acting yeast. It can be added directly in the dry flour, without first dissolving in water. You can easily buy it in baking supply stores or online. You can buy it from here.
If you cannot get your hands on instant yeast, then you can bake with active dry yeast. It is very easily available in all grocery stores. You will need to use it slightly more in quantity than instant yeast. For the exact measurements and directions , you can refer to my Bombay Sandwich Calzone recipe.
For more finger food inspiration you can try my Cheesy Kurkure recipe or Cheesy Spinach Samosa recipe.
To learn how to make Delicious EGGFREE Brownies, Home Baked Bread , and more from me, check out details of my online courses in the following the link :- Click Here
Print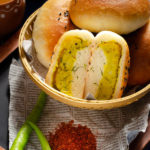
BAKED VADA PAV – MUMBAI STYLE
- Prep Time: 60 mins
- Cook Time: 20 mins
- Total Time: 80 mins
- Yield: 6 wada pavs
Ingredients
FOR THE BREAD
All purpose flour – 1 & 1/2 cup or 230 gms
Salt – ½ tsp
Instant dry yeast – ½ tsp
Powdered sugar – 1 Tbsp
Refined Oil – 2 Tbsp
FOR THE STUFFING
Oil – 1 Tbsp
Asafoetida – 1 pinch
Mustard seeds – ½ tsp
Curry leaves – 4-5
Turmeric powder – ¼ tsp
Garlic paste – 1.5 Tbsp
Ginger paste – 1 Tbsp
Green Chilly paste – 1 Tbsp
Boiled potato – 3-4 medium potato or 300 gms
Chopped coriander – 2 Tbsp
Salt to taste
Instructions
- In a bowl mix together all the dry ingredients for the dough. If you are using instant yeast like I am then add that also to the dry mix. If you are using active dry yeast, then you will first need to dissolve it in water before adding it to the flour.
- Add water slowly to the dry flour mix and make a soft dough. Knead for 5-7 minutes till it is soft and supple.
- Add the oil and knead it in the dough well. In a well oiled bowl, place this dough. Cover it with a moist cloth or clingfilm and leave it in a slightly warm place to rise for 20- 25 mins.
- Don’t wait for the dough to become double in size or very fluffy at this stage. If the dough over proofs (over rises) then it will get difficult to roll and shape into buns.
- For the stuffing, heat oil in a pan. Add asafoetida and mustard seeds. Let the seeds crackle.
- Add the curry leaves, green chilly paste, turmeric, ginger and garlic. Saute till the raw smell goes off.
- Add the boiled and mashed potatoes. Season with salt. Finally add in the chopped coriander after switching off the flame. Let this mix cool down completely. Divide it into 6 equal balls.
- After the dough has risen for 20 -25 mins, punch it down and divide it into 6 equal balls.
- Apply some oil onto a flat surface and roll the dough balls into a thick flat roti about 4 inch in diameter and 1 cm thickness.
- Place the potato stuffing ball in the middle of this and bring all the edges together, like we would do for making alu paratha. Pinch and secure firmly. Place the ball on the surface with the seam side down and then roll it using your palm , while stretching its surface and pinching it at the bottom to create tension. This will give a smooth top on the bread, otherwise it will have a lot of poch marks. Repeat this process for all the dough balls.
- Flatten this slightly and then, apply oil to prevent drying. Place all the shaped pavs on an oiled and dusted baking tray. Cover and rise for 30-40 mins. You can also use baking parchment paper/ silicon paper to avoid dusting the tray. Cover it carefully such that the pavs have space to rise on top.
- After they have risen in size, bake in a preheated oven at 250 C Celsius for 8- 9 mins. Preheat the oven for 15 mins.
- Once they are out of the oven, brush them with refined oil or melted butter, to soften the crust. They are now ready to serve.
Notes
- To make mini sized vada pavs , you can make 12 dough balls of equal size instead of 6 in this recipe. Bake them at 250 C for 5-7 mins.
- When you reheat these in the otg, set the temperature at the lowest setting and place them on the tray. Cover them with aluminum foil , to prevent further browning of the vadas. This will also prevent them from drying out. You can spray them with fine mist of drinking water with the help of a spray bottle, before reheating them. Do not heat them for more than 20 – 25 mins this way. So keep heating them in smaller batches. Once they are out of the oven, once again rub some melted butter on top , to make them look fresh and appetizing.
- You can bake them 3-4 hours before serving time. If you want to keep them for a longer time it is better to freeze them in a freezer safe container, do not store these in the refrigerator as the bread dries out and becomes crumbly. Just thaw it to room temperature before following step 2 for reheating. These can be kept frozen for 15-20 days. I haven’t tried freezing beyond this time.


Leave a Reply