Description
The perfect cookie for your valentine ! Buttery, crispy vanilla biscuits sandwiched with a decadent chocolate cream filling.
Ingredients
All purpose flour – 200gms or 1 + 3/4cup
Sugar – 80gms or 1/2 cup – 1 Tbsp
Unsalted butter – 80gms (use 3/4th of amul 100 gm slab)
Salt – 1/4 tsp
Baking powder – 1/4 +1/8 tsp
Milk powder – 2 Tbsp
vanilla extract- 1/4 tsp
Milk chocolate – 75 gms
Dark chocolate – 75 gms
Water – 25 gms ( 1Tbsp + 2 tsp)
Instructions
- Begin by making the ganache. For that melt the chocolate in the microwave. Keep stirring after every 30 second bursts. This will prevent the chocolate from burning. If you don’t stir the chocolate it will burn because of uneven hot spots.
- You can also melt the chocolate using the double boiler method. In a large vessel heat water till it is boiling. Then place a smaller vessel on its mouth such that only the base of the upper vessel comes in contact with the steam. Melt the chocolate in the upper vessel, stir continuously.
- Add the water to the ganache and stir using a spatula, till it becomes a smooth, shiny and silky mixture.
- For the cookies, sieve the powdered sugar to avoid any lumps. DON’T skip this step or else it will get very difficult for you to break the sugar lumps in the dough.
- Mix the flour and sugar well. Add salt and baking powder. Mix all this well.
- Add cold butter in the flour and with your hands rub the butter and flour. Till it resembles bread crumbs. This technique is called cutting the butter. Because it CUTS THE GLUTEN SHORT. ( read notes)
- Then add the cold milk or milk powder + water mixture in the flour and make a dough just until everything comes together. Also add the vanilla extract. Do not knead the dough a lot. Add milk little by little so that you don’t end up with a very loose and sticky dough.
- Flatten it on a clingwrap or plastic film and chill for 15-20 mins. This will harden the butter in it and it will become easier to roll and shape. Don’t chill it in ball form or else it will become difficult to roll. And also it will not harden evenly.
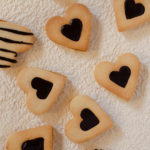
- Remove it from the fridge and flatten it on a dusted surface. Roll it thin , about 2-3 mm. then using a heart shaped cookie cutter, cut out the cookies. Keep aside half of these cookies, we will use them as the bottom cookie of the sandwich.
- In the remaining cookies , punch out the center using a smaller heart cookie. This way your beautiful chocolate filling will be visible.
- Place the cookies on a baking parchment paper And chill them again for 15 – 20 mins.
- Bake in a preheated oven at 180 C for 15 – 16 mins. Keep rotating the tray to avoid over browning.
- Once they are out of the oven, let them cool completely for atleast 20-30 mins before piping the chocolate filling on it.
- If they are too warm, the chocolate will melt and flow everywhere making the cookies messy.
- Get the chocolate to room temperature and fill in the piping bag. Pipe the chocolate on the cookies, press the hollow heart cookie on top.
- Now melt the chocolate in the piping bag to flowy consistency and fill over the uneven chocolate that it visible to make it look shiny and smooth.
- Chill them and enjoy !! they last for 1 week at room temperature and for about 2 weeks in the fridge.
Notes
- When butter ( or any fat) is mixed with the flour before any other liquid is added in the recipe, it coats the entire flour particle. This prevents the gluten strands to hydrate well and form long strands. That is why fat is also called “shortening” in some bakery recipes. Here it basically serves the purpose of “shortening” the gluten in the flour. Why is it advantageous to have short gluten strands? Well they provide the crispy, melt in the mouth bite that is desirable to have in cookies. We add the cold butter in this recipe because if the butter melts then the moisture in it will hydrate the flour which we do not want. Hence the dough is kept at low temperature all the time.
- So while in bread we knead the dough for a long time to get strong gluten development that supports the yeast activity and is able to trap the CO2 in its complex strand network, we handle cookie doughs minimally to avoid gluten development which aids in the perfect crispy texture.
- The cookies are chilled before baking because they remain white and do not brown too much while baking if they are cold before putting them in the oven. Also they will not spread too much or change shape in the oven upon baking.
- Every oven has hot spots , so it is necessary to keep turning the tray during baking as it prevents uneven cooking and browning of the biscuits.